Indoor plants
Black Leaves on Peace Lily
Black Leaves on Peace Lily
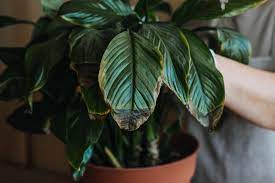
Peace Lily is low maintenance, but the black leaves indicate inadequate plant care. These plants are sensitive to sudden changes in their care. Improper care of Peace Lily takes a toll on the leaves when they suddenly change into brown or black.
It’s essential to know the causes before taking action. Below I have highlighted the common issues related to the blackening of a Peace Lily.
Improper Watering
The water level is to be balanced whenever you water Peace Lily. Over-watering and under-watering both have drastic effects on leaves.
Peace Lily’s origin is from tropical rainforests, so Peace Lily requires regular watering.
Peace Lily is no fan of under-watering. It will be evident if you don’t water Peace Lily because the soil will dry up, and the plant will die.
Whereas over-watering would overload the soil with water, and the excessive moisture suffocates the roots, and the soil becomes soggy.
The roots lose their function, and no proper nutrients are transported to the plant’s upper portion.
Fungal Infections
High moisture level invites fungal diseases onto the Peace Lily leaves. The signs are mostly seen in the shape of black or brown spots.
Fungus like Cercospora fungi thrive when the leaves remain wet, and the soil is excessively moist. Cercospora forms dark-grey circles having yellow in the middle.
Then there is Phyllostica fungus that forms harmful leaf spots. The leaves develop reddish or purple borders.
Rhizoctonia fungus also feeds on the leaves. They create multiple holes with yellow and alternating circles. You will notice several parallel spots on the leaves.
Age Factor
Peace Lily grows new foliage but sheds the old one. There are indicators that the houseplant will shed the old leaves soon.
The foliage starts to become black from the tips. This is a natural process.
Soon, the foliage starts to shed, and new leaves grow to replace them. You can prune the old black leaves at the base of the plant.
Use sterilized scissors to prune and always cut them from the stems. Avoid pruning the new leaves.
Over-Fertilization
Fertilizers consist of mineral ions that help the Peace Lily to thrive.
Most important ions like magnesium, potassium, and copper are essential for plant growth.
But if one of the minerals is excessive, it can damage the leaves.
If nitrogen is present in fertilizers in high quantities, it can change the soil’s pH.
The soil would then become acidic. The roots wouldn’t take in the salts, and the chemical imbalance would affect the roots.
The soluble salts start to accumulate in the soil after over-fertilization. This also causes a change in the soil environment.
Soluble salts in the fertilizers aid in providing food to the leaves. The salts are then combined with water to feed different parts of the Peace Lily.
If you add fertilizer to dry soil, these salts become unavailable, leading to the leaves’ blackening and drying.
Root Rot
Root rot is another severe problem that inhibits the growth of plants like Peace Lily. Root rot is also caused by a fungus living in the soil.
Root rot is mainly caused by over-fertilization or waterlogged soil. When a Peace Lily is overwatered, the moist soil becomes the cause of root rot.
The soggy soil causes the roots to suffer and become vulnerable to fungal infections. The accumulation of the salts also leads to the same outcome.
This then prohibits the plant from growing and circulating nutrients properly, eventually leading to an unhealthy Peace Lily.
How To Avoid Blackening of Peace Lily?
Fix the Watering so your Peace Lily perks up again
Make sure to keep your timing right and keep an eye on the soil of your Peace Lily. Whenever you are about to water it, check the soil before doing so.
Don’t let the Peace Lily soil become too dry or too wet. It should be evenly moist. If the leaves have become black, then it’s alright to prune them.
Use the help of sterilized scissors and then cut the leaves off.
The second precaution would be using a well-drained pot. I would suggest using a pot with adequate holes to avoid water accumulation.
Make sure the medium used is also a well-draining mixture so that it can discard away extra moisture.
Avoid Fungal Infections to stay in the clear
Baking soda is one of the safest methods to treat fungal infections on leaves. Baking soda has antifungal properties and is also non-toxic to leaves.
Mix a spoonful of baking soda in one liter of water and pour it into a spraying bottle. Spray on the leaves where fungal growth is visible. Repeat until all fungal growth is gone.
Another option is using a fungicide to control the fungal growth. Apply the fungicide onto the leaves as prescribed on the product.
If there is no progress, I recommend chopping off the infected parts. This would prevent the fungus from spreading.
Avoid Over-Fertilization to Avoid Root Burn
I recommend you wash the soil and pot to clean away the salts. Of course, this should be done only when you have a well-drained pot.
This will drain away all the piled-up minerals in the soil. You should use alkaline water to neutralize the soil’s acidic nature.
Treat Root Rot to Save your Plant
If the Peace Lily roots are not all mushy and damaged, then there is still time to save the indoor plant.
Take your Peace Lily out of the pot and remove the soil.
Wash the roots with distilled water and prune the infected parts of the roots with sterilized scissors. Wrap the roots with plastic wrap.
Keep the roots out of the soil until they dry up. Shift the Peace Lily to a new soil mixture.
Refrain from watering the Peace Lily for a while. This will allow the soil to dry up and recover. When the Peace Lily is healthy, water it gently.
Read more about how to grow a Peace Lily.

 العربية


